How I built a browser extension in 2021 (using modern tools and libraries)
Recently, I started working on my first browser extension for Firefox and Chrome. With this blog post I want to share my experience building a web extension with modern tools and frameworks in 2021. Therefore, this is not a guide on how to build a browser extension, but rather contains some useful information and tips I gathered while developing the extension.
goto:
- The scope of my extension
- What’s up with this
manifest.json? - using modern building tools
- The
browserAPI - some helpful tips - Use your favourite frontend-stack
- Ready for the stage? How to publish your extension
- Conclusion
🖼 the scope of my extension
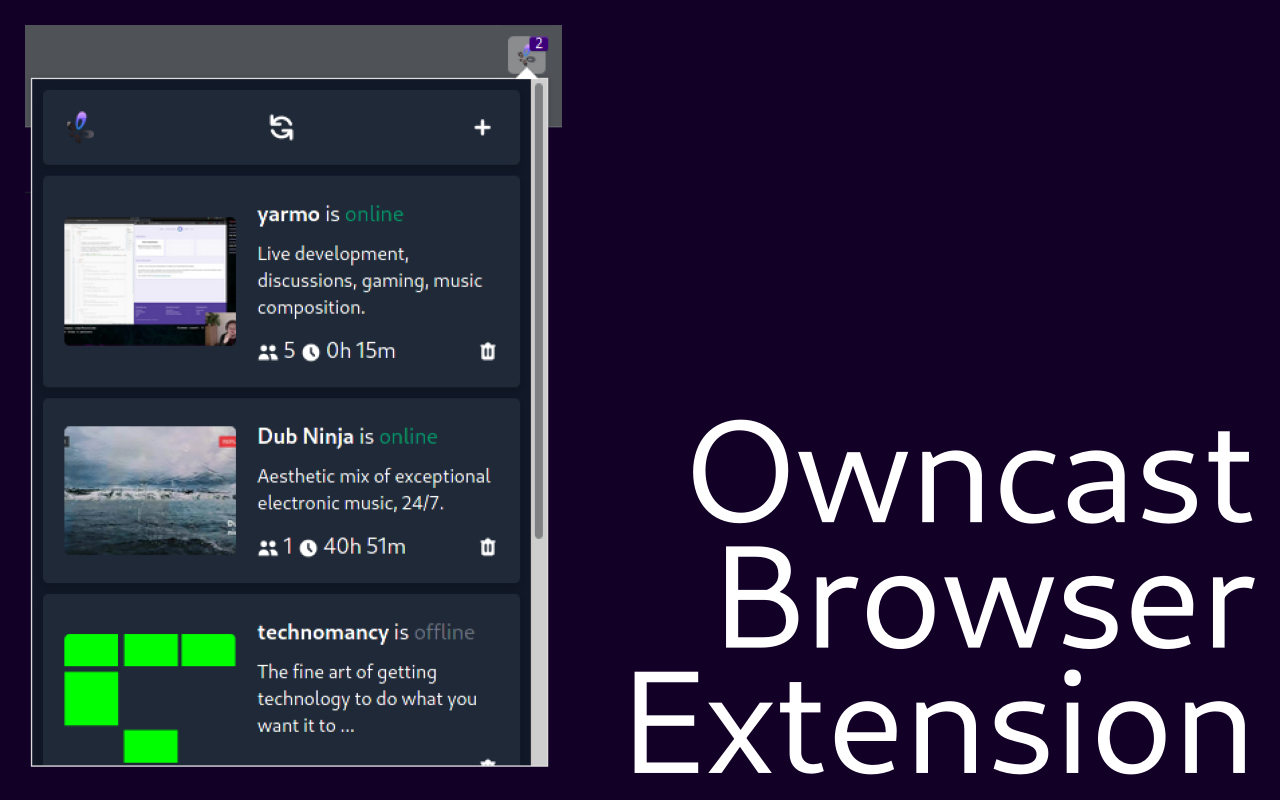
The extension I created is called Owncast Browser Extension, which can be used as a companion for owncast, a self-hosted twitch alternative. The scope is simple:
- Give the user a simple pop-up displaying a list of followed instances - the data is fetched from various REST apis.
- Send the user notifications whenever a followed instance goes online.
- Follow an instance by clicking a button when visiting a owncast page. This button needs to be inserted by the browser extension.
Let’s see what challenges I encountered while developing my extension.
🍱 What’s up with this manifest.json?
The most important bit when building the browser extension is the manifest.json. The manifest contains the most important information about an extension, as well as the entry points used by the browser. A simple manifest may look like this:
{
  "manifest_version": 2,
  "name": "Borderify",
  "version": "1.0",
  "description": "Adds a red border to all webpages matching mozilla.org.",
  "icons": {
    "48": "icons/border-48.png"
  },
  "content_scripts": [
    {
      "matches": ["*://*.mozilla.org/*"],
      "js": ["borderify.js"]
    }
  ]
}
A simple manifest example source
However, writing the manifest is not as easy as you might think. First of all, Firefox allows different keys and values than Chrome. Also, Chrome recently introduced Manifest V3, a new version of the manifest with new keys and features. However, as I want to support both browsers, and Firefox does not support Manifest V3 completly, I decided to stick with Manifest Version 2.
🔨 using modern building tools
Both Mozilla and Google offer documentation for building a browser extension. But while both pieces of documentation offer an awesome start point for new developers, they miss out providing much information on how to build an extension with modern build tools. And nobody’s to blame here - quite the contrary. Guides like this should stay as unbiased as possible regarding your tooling stack.
However, as a developer who loves to work with webpack, this left me with some open questions. Is it even possible to use webpack? What do I need to do?
Once I started digging into the process a bit, I found out that most things actually do not change compared to a normal webpack project. Both Firefox and Mozilla-Extensions are essentially just zip-files containing the manifest and your compiled files, such as your HTML, JS and CSS files.
This is similar to a usual frontend-only app, where you just have your compiled files sitting on a web-server. Usually, build tools will put those files into a dist/ or build/ directory.
So basically, we can just take our dist/ directory, bundle it into a zip, and we are done.
Luckily, Mozilla even provides a cool tool that makes bundling the add-on a bit easier, called web-ext.
🚚 using web-ext for easier development with Firefox
web-ext is a command line tool to help build, lint and run firefox extensions.
While web-ext lint checks the validity of our manifest and all included files, web-ext build creates the required zip-file containing all files.
Another useful feature is web-ext run, which starts a new firefox-profile with the browser extension installed from the build-directory supporting hot-reloading (for example with webpack --watch).
If you plan to develop a browser extension primarily for Firefox, I can highly recommend using web-ext!
👽 The browser API - some helpful tips
webextension-polyfill
When I started developing the extension, I started developing for Firefox. In Firefox, you can use the native browser-API to interact, well, with the browser: browser.storage let’s you storage items, browser.tabs let’s you interact with tabs, browser.runtime.sendMessage let’s you send messages in your addon-context with a Promise-based API, etc.
When first installing the extension in chrome, I was quite surprised when there was no browser-object. Instead, the chrome-object existed with similar functionalities, but working with a callback-based API.
This brings us into a annoying situation: Do we really want to duplicate the code for Firefox and Chrome based on their APIs and Interfaces?
Luckily, Mozilla comes to the rescue with their webextension-polyfill library. This library allows you to use the Promise-based browser-API used in Firefox in Chrome by importing it whenever used:
import browser from 'webextension-polyfill';

browser.browserAction.onClicked.addListener(() => {
  browser.tabs.executeScript({file: "content.js"});
});
This makes it super easy to work cross-browser. But I also recommend using this polyfill when just developing for Chrome, as the Promise-based API is much easier to work with compared to the callback-based chrome-API.
💬 Use sendMessage
When developing the first draft of the web extension, a major difficulty I found was communicating between the background script and the pop-up. I started out by using the window-object of the pop-up, which is accessible from both endpoints, background and pop-up. But doing this felt really “hacky”, and just not right.
Luckily, I learned about browser.runtime.sendMessage, a browser API which allows two-way communication between two parts of the browser extension.
Let’s take a look at a quick example: We have two parts, pop-up and background. Whenever pop-up starts, it wants to get some data which only can be accessed from within background. A simple code example could look like this:
// code in pop-up

// 1️⃣
browser.runtime.sendMessage({
    type: 'getData',
    payload: {...},
}).then((response) => {
    // 4️⃣
    // yourState could be Redux, Vuex or just a simple object
    yourState.commit('actionName', response.data)
}).catch((reason) => {
    console.error(reason);
})
// code in background
browser.runtime.onMessage.addListener((message) => {
    if (message.type === 'getData') {
        // 2️⃣
        return doAsyncBackgroundThings.toFetchData(message.payload)
            .then((data) => {
                // 3️⃣
                return {
                    status: 'success',
                    data: data
                }
            });
    }
})
If you are not familiar on how Promises work in JavaScript, don’t worry. All you need to know is that we can send a request from the pop-up to the background, where the event listener in the background will get this request. The object or Promise the background returns will be forwarded to the pop-up again, and the circle is completed. You can take a look at the numbers in the code to get a rough idea how the code will behave.
If you prefer a longer-lived connection because you want to send a lot of data, there is also a way for “Connection-based messaging”. browser.runtime.connect allows you to send messages on a lasting connection (this is somehow comparable to a socket or port that stays open all the time).
Both browser-API-based approaches have their advantages and disadvantages, but in my opinion both are superior compared to the old window-approach.
⭐ Use your favourite frontend-stack
One thing I really liked about developing the first extension was the freedom in terms of developing the “frontend” of the app. The majority of the frontend of my extension is the pop-up.
As the pop-up is really just a simple webpage built with HTML, CSS and JS, you can choose whatever technology you want to.
You are a React-Guy? No problem. You like working with jquery? Sure! tailwindcss is your favourite way of styling? Go for it! The w3c-specifications are the limit.
My first draft of the app was developed using VanillaJS and Handlebars templates. However, this was not really future-proof, and I refactored the extension using vuejs, vuex, and tailwindcss.
This shows that there are unlimited options on how to code your browser extension - just choose your favourite and start developing!
🕺🏿 Ready for the stage? How to publish your extension
So you developed your own first browser extension and you want to publish it so that other people can find and install it. There are multiple ways to do it, like offering the extension from your website or directly from GitHub by self-signing your extension.
However, most people will probably search for browser extensions using the official browser stores, addons.mozilla.org and the Chrome Web Store. My extension is actually published on both of them, so let’s talk about how it went!
In both stores, it’s really easy to start uploading your extension - just grab your .zip-directory, upload it and fill in some metadata and questions.
As I mainly developed for Firefox at first, I first published the extension in the Mozilla Addons “Store”. Here are some things I noticed while publishing:
- It’s free! No costs involved whatsoever.
- An extension has to go through an approval process:
- The extension is not allowed to contain the word “Firefox”
- In some cases, the whole source code needs to be submitted as well
- The approval process can take a few hours to days (but it only took 5 hours for me)
In general I would describe the process at addons.mozilla.org as really easy.
My experience with the Chrome Web Store was a bit different, however:
- You are charged $5 once for getting a developer account (This is not the end of the world, but especially for small open source projects its kind of disappointing)
- The extension has to go through an approval process as well
- However, you do not need to submit your source code
- It takes about 7 - 10 days for the approval to get through
Overall, the waiting and paying made the Chrome experience a bit more annoying than the Firefox side, but I guess this is just a minor difference. However, the process was pretty straightforward on either platform.
Conclusion
Writing a conclusion to this blog post is kinda wierd - what to say here?
Maybe let’s first talk about the experience I was able to get while writing my own extension.
This extension was the first “real” project I used VueJS and Vuex in. Therefore, it really helped my develop my skills for those libraries.
But more importantly I learned some browser APIs, like the runtime.sendMessage or the runtime.storage APIs, which are powerful endpoints that I never used before, and the knowledge I gathered is also useful outside the browser extension scope.
If you got interested in writing your own browser extension, I can highly recommend checking out the Extension Workshop by Mozilla on how you can get stated developing your own first browser extension, and see what’s possible with them.
If you want to learn more about the browser extension I created and take a look at the source code (or even want to contribute to it), check out the source code on GitHub.
Thanks for sticking until the end and reading this blog post. You want to chat or contact me? Hit me up on Twitter!